Showing posts with label decoration. Show all posts

Sunday, October 28, 2012

makeover for Flyt

I have tons of Ikea FLYT cardboard containers, but I don't like the white raw look they have, not really. I knew someone before thought about decoupage and other similar things, so this idea is not entirely mine... I'm just personalizing with my fabric of choice.

Wanna make one with me?

Then you'll need fabric, glue, trim, a piece of cardboard, scissors, medium brush and a pen. Oh, and of course a FLYT...

You must build your FLYT as always, following instructions. Then you place it on the fabric: tumble it  in every direction, to check if you have enough fabric to cover the thing. Also add 1cm for the borders.


Cut the fabric to cover exactly the sides of your FLYT.
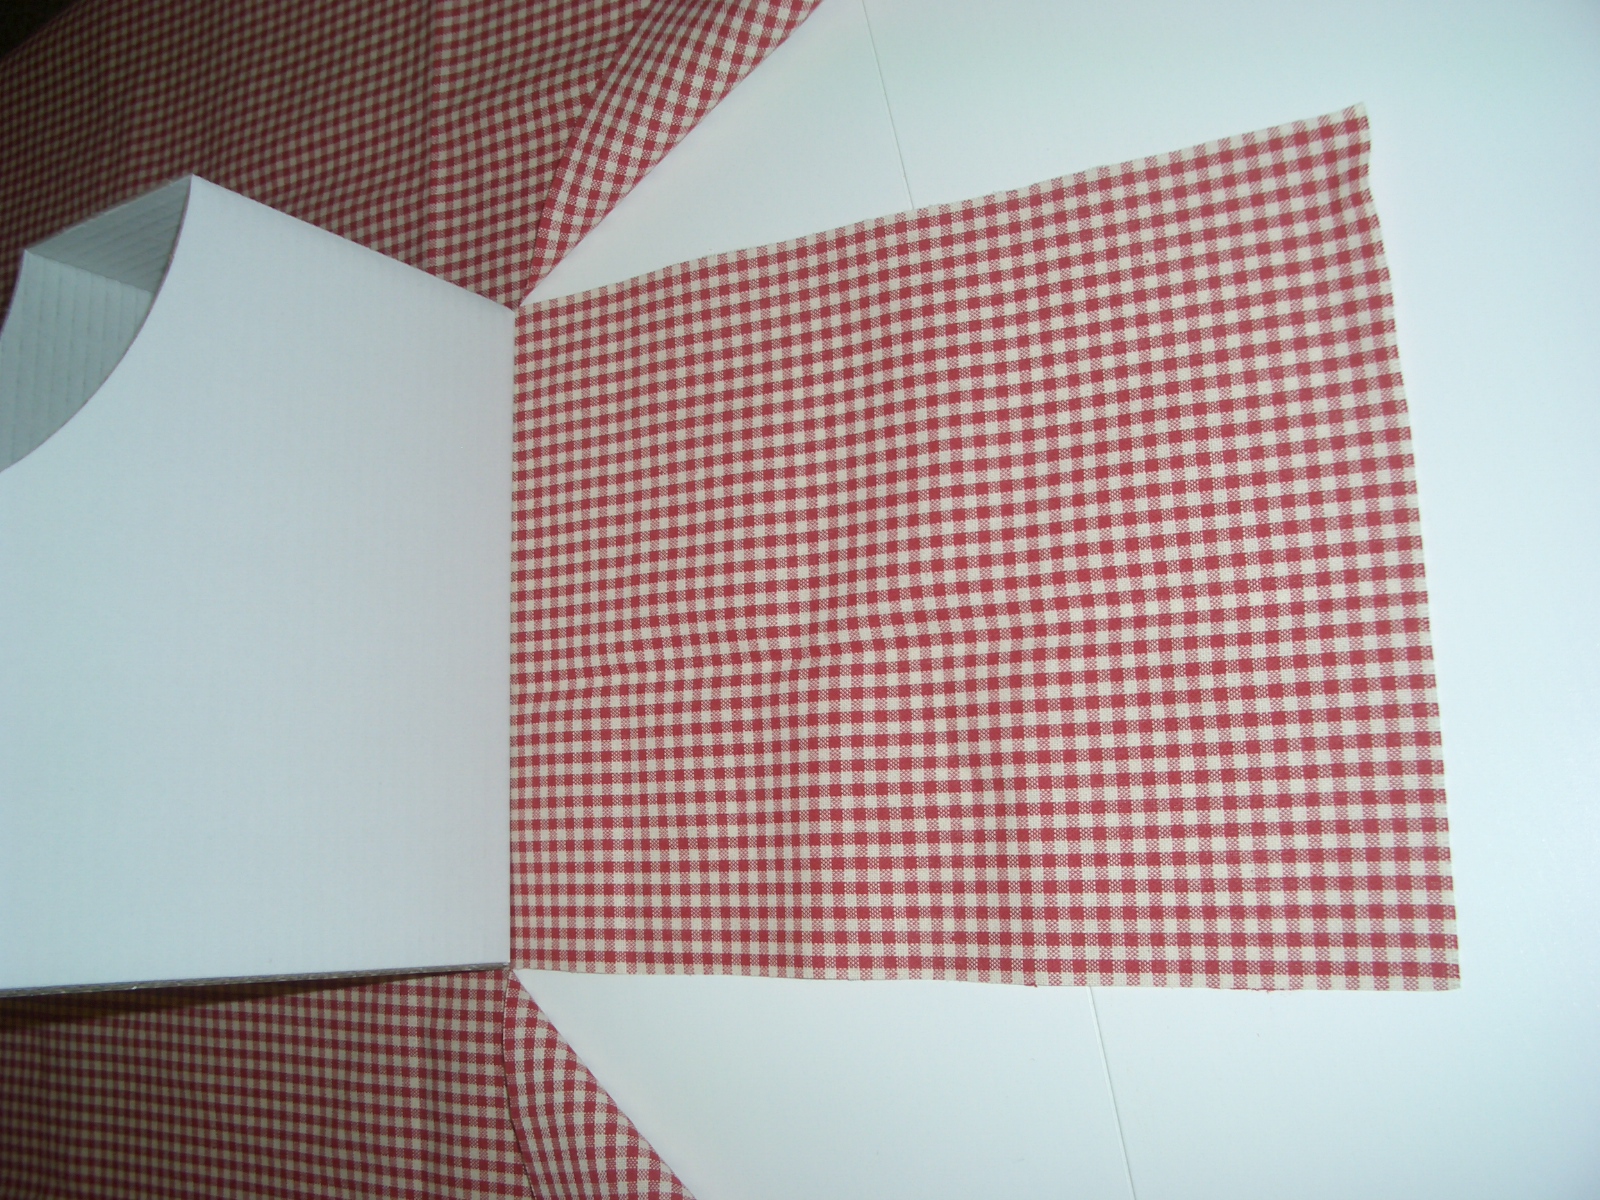

Brush glue on the entire side, just don't glue the borders or the cardboard will bend very un-nicely.


Attach the fabric to the glued side and press with your hands to smooth.


Cut the fabric on top following the shape of your FLYT. You'll end up with a nice scrap for future projects.


Put glue on the fabric (it will be more precise than if you glued the cardboard), and brush it all the way to the border. Be generous, but do not exaggerate.


Flip down to the cardboard the just glued fabric and press with your fingers. You don't need to cut the fabric to follow the curves, it's an oblique cut and it's like working with bias tape.


Make also the other side, in the same manner. Then switch to the smaller back/front (I don't know which is which). Cut the fabric a bit larger on the sides, for the overlapping junctions.


Cut the excess of fabric (always leaving some length for the border) and work exactly as you did for the sides: you just have to also put glue on the fabric that will overlap on the sides.


Do the same thing also on the other side. Now your FLYT is all dressed up.

(sorry, I don't know *why* this image just doesn't flip right...)
While the glue is drying, you can work on the label. I went with an oval form (which I drew using a plastic piece of orange (Smurfettes' courtesy). Cut your cardboard label and write whatever you want to put in the FLYT.


Attach your label on the front (small, big, your choice). Wrap some trim around your FLYT, make a little neat bow and you're finished!


Fill it with whatever you want (I use them for my recipes).


And this fabric covering is quite addictive... you can work this magic on every cardboard surface.


Sunday, September 2, 2012

instead of a headboard... - part 2

So today I snapped some photos with my phone, ergo... do not expect good quality. I'll make amend when my camera shows up and is properly charged.

This is the "headboard":


Ok, so the bed is a little messy... sorry for that.

This was also my first try-the-piping-thing project, and I totally intend to use this technique again.

The second instance was up and about in no time... experience does count, or so it seems...

I have a project or two still left for the girls' room, and then I'll give you the grand tour, as an "after" of my previous "before". Stay tuned!

Saturday, September 1, 2012

instead of a headboard...

... why not a bolster?

Smurfettes' beds don't have a headboard, and after long and careful thinking I didn't want to make things heavy with something woody, so I decided for a textile solution.

I surfed the net for inspiration, but everything was tufted or overly stuffed, and I wanted something more versatile, not to mention easily washable... you can probably relate with that last requirement if you happen to have kids like mine... artists, that is.

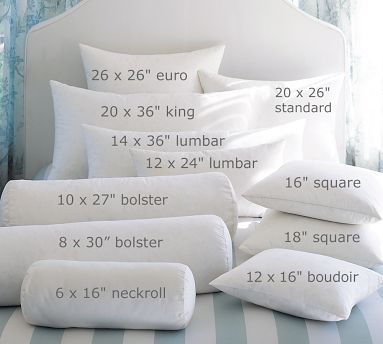
I came across a disquisition on the difference between bolsters and lumbars (I didn't even suspect there was a difference, by the way), and my brain lighted the proverbial light bulb. I stumbled upon this self explanatory picture that helped me in the choice:

found @ The Nester: check that blog, it's worth it

So today I got to work. I bought a roll of foam and cut it accordingly to the suitable size (and before you ask: I opted for a lumbar, not regular, 'cause it's about 17"x36"), bought also the striped cotton and linen heavy fabric, got out of my old stash a beige panama cloth for lining, a roll of purple bias tape and a sisal string (the last two for piping) and busied myself.


See the picture above? I was really busy for the whole afternoon, since I deployed the prototype, which in fact is so good that got promoted to the real thing.

I must clone that for the second bed, but I'm very satisfied of the result. You'll get to see the pictures tomorrow, 'cause the light is just horrible and everything keeps coming out wrong.

Thursday, May 10, 2012

working on furniture...

I'm furnishing home with Ikea-ware. That means I have something like 30 flat packs, obviously containing disassembled furniture, waiting for crafty hands (mine) to get to work.

I've been full immersed in the Ikea world, first for planning, then when actually buying and now for assembling, arranging and displaying everything. I'm enjoying every single moment of all this craziness. I know, hopeless. Must have some Mr Ikea's genes in my DNA...

I'm probably going to share some before&after shots, but I need some more time: I'm no fairy and certainly I don't own a magic wand to order things around. Assembling does take time. Bear with me, please. I promise it'll be worthy.

Wednesday, April 11, 2012

next diy projects with pallets

Life has taken unexpected turns lately, and my craft skills are aiming to unexpected targets too.

I've been fascinated by eco-pallets diy projects, and surfing the net for some inspiration.

headboard @ a typical type A
shelves @ a typical type A
photo display @ a typical type A
shelf @ AmandaCarver Designs
bench @ Our vintage home love
wall art @ PB&J stories

Ain't they gorgeous? I'm going to try a couple of them very soon. Thank god at work we have a large stock of broken pallets to dig into. Must buy tons of sand paper... and paint too.


Saturday, March 31, 2012

my new jewelry organizer

I don't really have a lot of jewelry, but I like having my things well organized. I went online for inspiration (there's so much inventive out there!) but I already had in mind what I wanted.

I had an old wine wood case (yeah, another), made for a very big bottle of sparkling wine. I painted it white, fixated some hooks, nailed a hanging system and... voilĂ ! This is how it came out. Sooo like the result!


I found those square ceramic little bowl at the market, and I use them for my rings, my earrings, my bracelets and my watches.


The hooks were too long and the screws punctured and came out on the shelf, so I took a piece of cardboard and covered it with some nice fabric and placed it on the bottom of the shelf: nice and clean.


Under the shelf, the hooks hold my necklaces and keep them from clinking and tangling.

All in all, this system is working very well. I might add some more hooks or other decorations, but I think I got it right for what I have.

What do you think of it?

Thursday, March 15, 2012

training for vertical garden - wall art edition

I've found this DIY wall art:


(googling about sometimes does help)

Given my current obsession, I figured I could train a little bit with a smaller wall art project. So yesterday, when purchasing soil for my vertical garden, I found those tiny succulent plants an a light wood box.

During my night FOX session, I took out my white paint and everything and made this (sorry, the shots are soooo poor... blame it on the light):

little succulent vertical garden
The wall art project (I know, a bit exaggerated) is currently and proudly hanging above my couch, and it's very nice and soothing to look at.


It was also very easy and ridiculously cheap:
- € 0,50 for the wood box
- € 0,60 each for the succulents
- white paint and string
It's worth every cent.


All in all, I think I can manage a bigger project... can't wait to play with the girls!

Friday, January 6, 2012

nativity scene is complete

Everything has a place in this year nativity scene... well, until I can keep it out of Smurfette2's reach, that is.


Sunday, December 4, 2011

crafty christmas - part 2

This year I'd rather make a nativity scene than a christmas tree... so I made a setting which is going to host the scene as soon as it's dry (I painted it today).


I don't like scenes with "wrong" environments, so I dropped the mountain cottage I used last year and bought some polystyrene and spent two days cutting and glueing and painting.

I also built lots of brick walls and this tiles flooring, and my well has now a little bucket that's really perfect.

Fortunately the statues are in the right size (I built up the scene without a model, I roughly remembered the size from last year...)

crafty christmas - part 1

This Christmas I'm feeling crafty... so here are some of my creations (which surprisingly don't involve fabric... for now).

These stars are very easy to do and they do give this nordic touch to the house.


Yes, I know... the lavender wall isn't christmas-y at all, but that is going to change soon (I hope).