Showing posts with label kids. Show all posts

Monday, October 1, 2012

kids' rack for towels - school edition

School has started. I can't believe Smurfette#1 is in her 2nd year... where does the time go?!

This year the teachers want the kids to use fabric towels instead of paper ones, so I duly sent my girl to school with one of her old labelled towels she used in preschool (never throw away those!).

Some days after, the teacher asked for some hooks, 'cause the towels (hanging under the jackets) seemed to never be reached by little hands... (on the other hand, the jackets...)

One of the teachers pointedly watched me saying "we could use a rack, if some of you parents are feeling crafty..." Duly noted. So... wait while processing... and that's the result:

horrible shot of the rack
Bought a wood piece (plain), drilled little holes for little metal hooks, used a brush with green paint, white paint, passed sand paper, added little plastic insects for decoration and stamped little numbers over every hook.

A busy hour, but very satisfying. Teachers' feedback was also positive, so everybody is happy.

perspective view
"worm" detail
"butterfly" detail


What do you think?

Sunday, September 2, 2012

instead of a headboard... - part 2

So today I snapped some photos with my phone, ergo... do not expect good quality. I'll make amend when my camera shows up and is properly charged.

This is the "headboard":


Ok, so the bed is a little messy... sorry for that.

This was also my first try-the-piping-thing project, and I totally intend to use this technique again.

The second instance was up and about in no time... experience does count, or so it seems...

I have a project or two still left for the girls' room, and then I'll give you the grand tour, as an "after" of my previous "before". Stay tuned!

Saturday, September 1, 2012

instead of a headboard...

... why not a bolster?

Smurfettes' beds don't have a headboard, and after long and careful thinking I didn't want to make things heavy with something woody, so I decided for a textile solution.

I surfed the net for inspiration, but everything was tufted or overly stuffed, and I wanted something more versatile, not to mention easily washable... you can probably relate with that last requirement if you happen to have kids like mine... artists, that is.

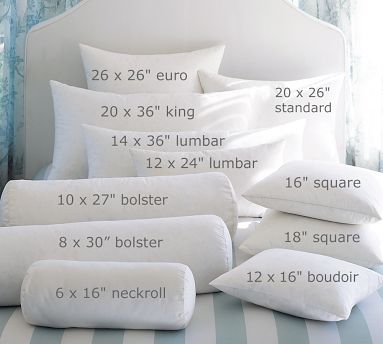
I came across a disquisition on the difference between bolsters and lumbars (I didn't even suspect there was a difference, by the way), and my brain lighted the proverbial light bulb. I stumbled upon this self explanatory picture that helped me in the choice:

found @ The Nester: check that blog, it's worth it

So today I got to work. I bought a roll of foam and cut it accordingly to the suitable size (and before you ask: I opted for a lumbar, not regular, 'cause it's about 17"x36"), bought also the striped cotton and linen heavy fabric, got out of my old stash a beige panama cloth for lining, a roll of purple bias tape and a sisal string (the last two for piping) and busied myself.


See the picture above? I was really busy for the whole afternoon, since I deployed the prototype, which in fact is so good that got promoted to the real thing.

I must clone that for the second bed, but I'm very satisfied of the result. You'll get to see the pictures tomorrow, 'cause the light is just horrible and everything keeps coming out wrong.

Monday, August 6, 2012

I've sewed again!

Today I finally used my sewing machine and serger after a loooong pause. In the chaos of the moving I've been neglected them for long enough.

I made the simplest dress for my Smurfette#2, on a pattern I already used for her, only slightly bigger. I plan on doing another for Smurfette#1 once I find a suitable fabric (light and fresh and NOT pink).

This is it. Sorry, the shots are very poor... but I can't find my camera... I know it's there, I just don't know in which box it is.


The fabric is from my local shop, and it's a very light printed cotton, with uneven dots all over. It's just the perfect thing for the abnormally hot weather we're having here... I don't even know how they named it... Circe, Ulisse, Nerone... this year is all about ancient times... I don't know and I don't care... all I know is that's freaking hot and we're melting... guess I'll sew a few also for me...

Tuesday, May 22, 2012

mother-daughter dialogues on big themes

Dialogues with Smurfette#1 (6 years old)

GEOLOGY SESSION:
Sunday, after a (very) noticeable earth tremor:
"Mom, is it the sleeping volcano (i.e. the Baldo mountain) awakening?"
"No, sweetheart, that was the mountains (i.e. the Alps) growing up."
(a brief lesson on tectonics with paper sheets followed)

THEOLOGY AND RELATIONSHIPS SESSION:
Yesterday evening, during dinner:
"Mom, I think Jesus was nice when He chose you as my mom."
"And why is that?"
"'Cause I like you very much and you're the coolest mom of all."
"Thanks, love. I like you too."
"Ok, then. So you can give me something sweet instead of that, right?" (*that* being her evening meal, obviously untouched).
...


Friday, May 11, 2012

new girls' bedroom - before

I've started tackling the huge mountain of Ikea flat packs of furniture, and the first room I decided to assemble was the girls' bedroom.

It's the bigger room in the house (4.30mtx3.90mt): that's exactly the reason why it's theirs. Although the window faces the north, the room is bright because in front of the house there's a wide but tranquil street and no high buildings.

Here's a very unflattering "before" (please don't mind the mess):


which actually is not the real "before", 'cause before I painted it in lilac it was completely white. I don't have anything against white, in fact I like it very much, but when you have a 2.95mt floor-to-ceiling wall, you might want to make it look a little less intimidating... especially when the room is in a girls' bedroom.

I was asked to paint it pink (and you can easily imagine who asked), but I compromised with lilac.

For this room I have to assemble:
- 2 beds with storage (one down, one to go)
- 2 wardrobes (one down, one to go)
- 2 chests of drawers (one down, one to go)

But this is not the biggest part: the final touches (curtains, beddings, carpets, lights, ...) are going to take forever to be done and ready.

I'll post news as soon as I can.

Monday, March 19, 2012

another way to go green on St Patrick day

I'm not Irish, but this year I went green in my own way on St Patrick day. It was a coincidence.
I planned to work at our vertical garden on Saturday morning, with both girls to help out with soil and seeds, but it was too chill and windy for the little one. Only Smurfette#1 did work outside with me. Smurfette#2 was crying and yelling and drooling at the window, wanting to "have fun" with me and her older sister (we did try to keep her otherwise occupied... to no avail, she kept running for the window).

I had taken home some wood boxes I had at work, which I was using as shelves for my server farm room... I know, I'm crafty even at work... I'm hopeless.

(please, don't mind the mess) In this shot, I had already removed three boxes (top right)


The boxes are marked with our brand (I work at a medium sized winery): at first I wanted to erase that and paint the boxes, but I actually like them better as they are.

On saturday morning, I prepared the boxes: I put inside a film (which I had previously pierced with little holes for transpiration) to protect the wood, then I added some clay balls for draining. Smurfette#1 put a thin layer of manure (when she understood what it was she made a priceless "ewww" face) and then proceeded to fill the box with soil. We then planted the seeds and, after covering with some more soil, she proudly and happily watered about with her brand new watering can.

Sorry, I didn't take any picture of that, cause I was hands deep in everything... not so practical, nor clean.

boxes all ready
We lacked the shelf, though, so the boxes sat on the floor till Sunday, when we came home from a spot trip to Ikea. I built up the thing (very easy, 10 minutes max), with the omnipresent allen key (which is also - and not casually - the Ikea iPhone app symbol...)

the making of the shelf
When it was in its place, I positioned the boxes. I was under the illusion that for each shelf there would have been two of them... unfortunately, they are 1 single millimetre too large to fit (@#&%$!), but maybe it's better that way, so the light can reach the plants more efficiently.

and that's it, all done (mostly) - in this shot you can't see the box of tomatos (bottom left)
I'll buy another, if that's the case. For the time being, the garden is so composed (top to bottom, left to right):
1st shelf: vase of little yellow roses - strawberries
2nd shelf: radish - accessories for gardening
3rd shelf: lavender - zucchini
4th shelf: box for carrots (yet to come)
on the floor, to the left: tomatos

Also, on the balcony, I planted some rosemary (cutting from the garden outside the office...), sage, and a friend of mine (well, her mother, who obviously doesn't trust us with the seeds... and maybe she's right) is growing basil also for me.

I've still some seeds left to plant, but the time is not right... and time in gardening is essential.

I'll let you know if we improve our garden.


Thursday, March 15, 2012

gardens and new project

I have a new obsession: vertical gardens.

A vertical garden is a great way to go green, decorate and train your green thumb (even if you don't have one...). In a vertical garden, plants, flowers or vegetables are "stored" vertically, in many possible ways. You can use a simple shelf, or a specifically designed shelf. Both work well. So basically you can get a vertical garden with whatever budget you want.

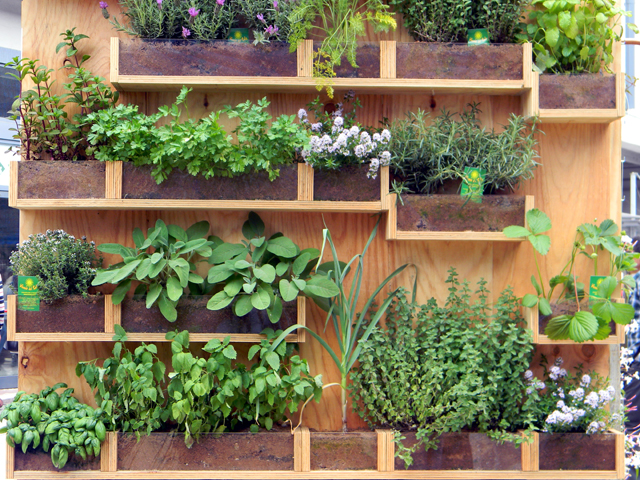
I especially like this (professional) solution, which is very neat and minimal:

YUU modular system @ Borella Designs
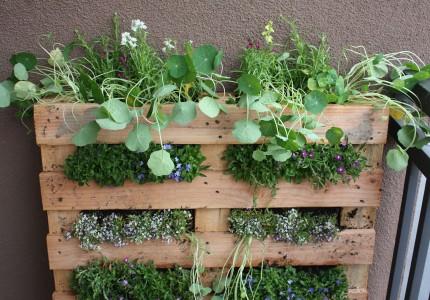
But I happen to like also other DIY solutions, like this one:

found here
or this one:

found here
Having two kids, I thought about giving into this new obsession of mine and make it into a long-term educative project for them. So I'm planning something like this one:

found here
which is both cheap and suitable for my limited space requisite... I already purchased soil and seeds, I've plenty of wood crates to put plants in and I'm going to get just the right shelf (the same one in the above photo, by the way) which incidentally is the Lerberg @ Ikea

(see? Ikea addicted)

I'll share the steps of the project with you, kids, dirt and all. :)

Friday, March 9, 2012

life lessons and kids

Today I read this post by Charity@Indietutes: oh, girl, I can definitely relate to that!

I have two girls: one is 1 year old and cannot properly talk (yet), and one is 6 and she sure knows one thing or two...

Now, and - if the present is of any indication - in the future, I'll have my share of life lessons to hand out, and undoubtly my share of awe at kids' reasoning and understanding of life. Never fail to amaze me, those two...

Hopefully, I'll get the same amount of life lessons from them. Can't wait! :)

Smurfette#1: 6 years old
 this is her very first day at school (september 2011).
See that grin? yeah, she's like that...

Smurfette#2: 1 year old
that's the face "thanks mom, I can manage"

Thursday, February 23, 2012

messing up with... Nutella!


I should have known beforehand... I've passed my genes onto the next generation. See the glass above? Yep, that's the Nutella glass. I'm addicted to it. No wonder my Smurfettes also are. Two out of two.

I have proofs:

tasting it
really liking it!
It sure boosts your energy (and that's why I have the big jar on my desk at office... with a *big* spoon).

"See Mom? I'm fully recharged!"

Sunday, February 5, 2012

pink fairy costume

Well, Pink Fairy got Smurfette#1's approval.


It's a basic costume, 'cause the teachers told us (enthusiastic) parents that at some point during the school day the costumes would be gone... you know, to learn something. That was fine with me, so I complied planning a simple costume, that Smurfette#1 could take off easily and that would still leave her fully clothed for a school day.


So the gown is a simple jersey full circle skirt, with a silver waist band with plastic automatic buttons on the back. Underneath there's toulle to get the volume. I made four roses with silver strings and attached them at the waist, 'cause "Mom, I'm a spring fairy!".

The top is a simple jersey sleeveless shirt. Wings are from "H&M". No magic wand that could be used as a weapon in school. Better safe than sorry.


Under her costume, she wore leggings and a warm cotton white shirt.

When I picked her up in the afternoon, one of the roses was... separated from the gown, and the hem was nowhere near the white concept anymore... but the whole thing was still in one piece, so to speak.

(Thank god for my Sergej...!)

So for this year I can safely assume I'm done with Smurfette#2's costumes... until Halloween, that is.

Sunday, January 29, 2012

fun is everywhere

They do have a room of almost 323 sq ft, packed with every toy known to mankind... *but* they spent half an hour here:


Can you believe it? It's not even comfy... Those two...!

Monday, January 23, 2012

tote for baby book project

Smurf#2, who's in kindergarden, is going to join in the reading fun (well, his mom will read, he will behave - ah! - and listen...) and is in urgent need of a tote to take books home.

(sorry, not pressed...)

Kindergarden gave Sis precise directions, and I didn't have much space for maneuver... except for the lining... this is the result.

(guess what? Ikea soft fabric!)


Even if I had restrictions, I must say I like how it came out. Easy peasy!

I embroidered the name with a very simple stem stitch

Friday, December 23, 2011

christmas - last year


Last year I didn't have a blog for my drabbles, but I did keep track of things. Here's last year Christmas little crafs, mostly made as gifts.

Neighbours' gifts
Some stuffed hearts, a little country in style, almost entirely hand stitched, in dyed cotton. Really pretty, and not only I liked making them, but also packing them. Plus, giving them for Christmas is just the top.


Pot holders
Always useful and never enough, in tablecloth and sweet old honeycomb fabric. You may also obviously conclude that I do love packing gifts...


 Stockings
I made them for my nephews. Maybe the design is not top-class (bear with me, it was my first time), but the outcome is nice... and when I filled them it really was better!


Sunday, September 18, 2011

hair clips board

I can't find any more the post that inspired this... sorry. I've found the post @prudentbaby.

My Smurfette#1 has lots of hair clips which I find anywhere in the house, but never when they need to be found. I got tired of this, and that post gave me just the right answer.

This hair clips board is very simple: it only takes 10 minutes to make and no effort at all. This is what I came up with:


Smurfette#1 was very happy that I make her something and told me: "Thanks, mommy. It even goes with my beauty shelf! you're good". Thanks, sweetheart....

(Yes, she has a beauty shelf: it's a shelf with all her 'make up', brushes, a mirror and a lamp. Figures.)

(I don't have a beauty shelf, in case you're wondering...)