Showing posts with label crafting. Show all posts

Sunday, October 28, 2012

makeover for Flyt

I have tons of Ikea FLYT cardboard containers, but I don't like the white raw look they have, not really. I knew someone before thought about decoupage and other similar things, so this idea is not entirely mine... I'm just personalizing with my fabric of choice.

Wanna make one with me?

Then you'll need fabric, glue, trim, a piece of cardboard, scissors, medium brush and a pen. Oh, and of course a FLYT...

You must build your FLYT as always, following instructions. Then you place it on the fabric: tumble it  in every direction, to check if you have enough fabric to cover the thing. Also add 1cm for the borders.


Cut the fabric to cover exactly the sides of your FLYT.


Brush glue on the entire side, just don't glue the borders or the cardboard will bend very un-nicely.


Attach the fabric to the glued side and press with your hands to smooth.


Cut the fabric on top following the shape of your FLYT. You'll end up with a nice scrap for future projects.


Put glue on the fabric (it will be more precise than if you glued the cardboard), and brush it all the way to the border. Be generous, but do not exaggerate.


Flip down to the cardboard the just glued fabric and press with your fingers. You don't need to cut the fabric to follow the curves, it's an oblique cut and it's like working with bias tape.


Make also the other side, in the same manner. Then switch to the smaller back/front (I don't know which is which). Cut the fabric a bit larger on the sides, for the overlapping junctions.


Cut the excess of fabric (always leaving some length for the border) and work exactly as you did for the sides: you just have to also put glue on the fabric that will overlap on the sides.


Do the same thing also on the other side. Now your FLYT is all dressed up.

(sorry, I don't know *why* this image just doesn't flip right...)
While the glue is drying, you can work on the label. I went with an oval form (which I drew using a plastic piece of orange (Smurfettes' courtesy). Cut your cardboard label and write whatever you want to put in the FLYT.


Attach your label on the front (small, big, your choice). Wrap some trim around your FLYT, make a little neat bow and you're finished!


Fill it with whatever you want (I use them for my recipes).


And this fabric covering is quite addictive... you can work this magic on every cardboard surface.


Saturday, July 21, 2012

fake cake

I've always skipped blog posts on fabric cakes 'cause I thought I was never going to make one anyway... so why bother?

But this year I helped with the cake selling at school and I wanted to make something for the stall... I already made a chocolate cake, but I thought... why not? and made this fake cake.


The cake is a chocolate, cream and strawberry deliciousness... if it were real, I would have swallowed it whole...


The strawberries are Tilda style, I found a tutorial online that I can't find anymore, sorry.

Being my first (and probably last) try, I am perfectly satisfied. I still think that fabric cakes are not my thing, but I'm happy that this one is now a permanent installment at school... the kids were in awe...!


Friday, May 25, 2012

new bedroom - before

Let's continue the house tour with the before installments, and here we are in the master bedroom.


Not the best angle, I'm afraid...

Here I used the same dove-grey as the entryway, but painted it full height, with horizontal stripes. You might have noticed I used a stripes pattern which is different for every room. It is not a coincidence, obviously.

For this room, furniture includes:
- two wardrobes;
- one (big) chest of drawers;
- one bed (duh!)
- side tables;
- big rug;
- lights;
- decoration.

This room will also stage three of my most ambitious projects:
- the craft corner
- the headboard made of pallets
- the bed skirt

While I've already planned out everything about the headboard (and I mean planned, down to the last nail) and the bed skirt, I'm still unsure on the outcome for the craft corner. The space is very small and it will have to be highly and perfectly organised to hold everything I have for crafting. This is worrying me, 'cause the current space is *much more* big than the one I have in this new house... I'm probably going to store some things in other places. I hope not, but I might have to. And certainly I'll have to move to another room to actually craft, especially if it's the sewing.

Stay tuned for updates.

Saturday, March 31, 2012

my new jewelry organizer

I don't really have a lot of jewelry, but I like having my things well organized. I went online for inspiration (there's so much inventive out there!) but I already had in mind what I wanted.

I had an old wine wood case (yeah, another), made for a very big bottle of sparkling wine. I painted it white, fixated some hooks, nailed a hanging system and... voilĂ ! This is how it came out. Sooo like the result!


I found those square ceramic little bowl at the market, and I use them for my rings, my earrings, my bracelets and my watches.


The hooks were too long and the screws punctured and came out on the shelf, so I took a piece of cardboard and covered it with some nice fabric and placed it on the bottom of the shelf: nice and clean.


Under the shelf, the hooks hold my necklaces and keep them from clinking and tangling.

All in all, this system is working very well. I might add some more hooks or other decorations, but I think I got it right for what I have.

What do you think of it?

Monday, March 26, 2012

key fob - 1st try

I've been drooling over other bloggers' creations of key fobs. I've never found exactly the right rings and hooks, but I wanted to try anyway.

This is how my project turned out:


So, guess what I used for the fob? This thing!


As you can see from the picture above, it's a rolling shutter rope, in cotton and nylon. I burned the cuts, so  everything stays in place. I'm not 100% satisfied with that, 'cause the cotton part tends to darken when burned... but you almost don't see that.


Being the first try and all, I do like it and I plan on making some more, maybe with a different method. 

Could be useful finding the right hardware, though... anyone knows where I can buy online?

Saturday, March 3, 2012

I know it's almost spring...

... 'cause I've been to Abilmente in Vicenza, and it was the spring installment. So on with the spring spirit!

This is what I brought home from the fair.


I must admit I didn't appreciate the smaller size of the fair, although there was plenty of shops and stands and crafty things. I had fun anyway. I just didn't like the cake design section so much, especially when that way you end up with less space for other creativity fields... Enough with the rambling.


I bought some quilting notion: a bigger rule (Omnigrid) that I paid half of the one that's half its size; a magic pen, water washable, for the quilting.


There also was the national association, so I went to get my badge... finally!


Then I fell in love with this book that explores various techniques for paper, some easy and kid suitable, others a little more complex.


I was in desperate need of ribbons (baby pattern), bias, ric-rac and nylon string for beads.


Then I found those two essences: orange and cinnamon. I plan on making something for my bathroom.


These are cutter (for paper) that I bought for my daughter, who's very crafty with colored cards: and I didn't resist this other border cutter:


I finally found these (photo below - I don't know how you call them), to be soon used for key rings:


Some stamps and ink both for me and for my daughter.


A friend of mine gave me this stick of pure and organic linen: I must think of something to embroid, now, right?


And lastly: a wood heart that's almost identical to the one in my logo... had to get it!


On sunday morning I'll return to the fair with a friend of mine at her first experience. It will be fun! (again)

Wednesday, December 7, 2011

crafty christmas - more on nativity scene

Yesterday Smurfette#1 almost completed our nativity scene, and Smurfette#2 promptly proceeded to undo everything 2 minutes after. But that's one of the things about our nativity scenes: we set them up, reset them and set them up once again (several times).

Here are some sneak peeks. There are only the basics: the holy family (minus the baby, who's arriving on the 25th) and the animals (sheeps, ox and donkey). The christmas star is coming around the 20th and the three wise men will step on the scene on the 5th.

But for now, this is it:

I had fun building brick walls and also making the door.
I bought the little bricks in a craft store,
but the door is made with popsicles sticks and a wood skewer.


Sunday, December 4, 2011

crafty christmas - part 2

This year I'd rather make a nativity scene than a christmas tree... so I made a setting which is going to host the scene as soon as it's dry (I painted it today).


I don't like scenes with "wrong" environments, so I dropped the mountain cottage I used last year and bought some polystyrene and spent two days cutting and glueing and painting.

I also built lots of brick walls and this tiles flooring, and my well has now a little bucket that's really perfect.

Fortunately the statues are in the right size (I built up the scene without a model, I roughly remembered the size from last year...)

crafty christmas - part 1

This Christmas I'm feeling crafty... so here are some of my creations (which surprisingly don't involve fabric... for now).

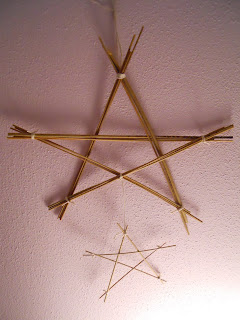
These stars are very easy to do and they do give this nordic touch to the house.


Yes, I know... the lavender wall isn't christmas-y at all, but that is going to change soon (I hope).

Saturday, November 5, 2011

Abilmente - Winter Edition 2011 : what I took home

This post is unforgivably late...

March and October are two of my favourite months, 'cause in Vicenza (Italy) - which happens to be 30km far from home - we have a wonderful fair: Abilmente

While in march it focuses on Easter, in october is all about Christmas. It's really fun and it's a paradise for creative souls... I always go and take home whatever catches my imagination... well, on a budget, obviously. I've found on my expenses that it's crucial to fix a maximum amount to spend, otherwise you end up compulsively buying just about everything. 

This year I was on a crisis-dependant budget, so I really didn't took home all I wanted, but still... 

NOTIONS:
that's for my cross stitch projects, that usually involve no less than 20 different colors... this should help me keeping things in order

again, for my cross-stitch, plastic bobbins to hold everything in place when stored away; stitch holders for my knitting projects; knitting needles for my socks projects (which I have, but never acted on)

RIBBONS AND STRINGS:
ric-rac and ribbons, intended for Smurfettes' costumes projects

something elaborate both for sewing and other crafts

some quality string, which I bought with package in mind.

I also bought some fabric, but I can't show anything 'cause it's secret projects related. That's all, for this year. Well, if you don't consider the brain overload I came home with...